 |
The Wheels
4 of the caps will be used as wheels. Drill a hole in the center of all the caps just big enough to pass the wire through. It is important to be in the center as much as possible.
The Pulley
1 cap will be used as a pulley. Using a pair of scissors, remove the part of the cap that screws onto the bottle, leaving only the top flat part. The inside part of the cap is designed with a small inner wall to hug the bottle rim to give it a tight fit and prevent leaks, this inner wall will serve as the support for the pulley. Please note that not all caps are made the same or may not contain the rim. In this case you may want to use a film canister top instead of a bottle cap.
|
 |
Building the Driving Wheel
Glue one cap and the pulley together, make sure that the holes are aligned and make sure that the higher part of the pulley is on the outside, creating a groove in the middle.
Axles
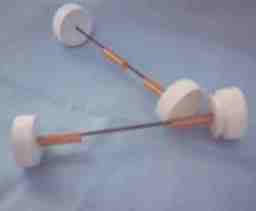
Cut 2 pieces of wire about 12cm long (4 1/2 inches), make sure that they are straight. Cut 4 pieces of straw about 2 1/2cms (1 inch). Slide 2 pieces of straw onto each wire. Place the driving wheel on one end of a piece of wire (the open part of the cap facing outside). Add the other caps on to the end of the wires, all with the open part facing outside. Glue the caps on to the ends of the wires (make sure that they are all centered otherwise your car will wiggle and may not drive straight). You may want to do one at a time and let the glue dry before doing the other wheels (be patient).
|
 |
The Base or Chassis
Place each axle about 1 1/2cm (> 1/2 inch) from each end of the thin wood board (or cardboard). Use a piece of tape (over the wire) to hold the axle in place while you adjust its position. Once you have it in place use another piece of tape, this time over the straw. Adjust the space between the straw and the wheel in a way to prevent the wheels from moving too much and keep it centered as much as possible. Once positioned properly, tape the straws in place to the wood-board or cardboard.
|
 |
The Motor
The motor will be connected to the driving wheel with the elastic band, so position the motor on the wood-board or cardboard (close to the driving wheel) in a way to keep the elastic band stretched from the driving wheel to the motor (not too much not too little) and straight with the pulley. Mark the place with a pen or pencil. To secure the motor in place you may want to build some sort of support instead of gluing it permanently to the base. This way you can use the same motor again for another solar car or future project. Use 2 small pieces of wood or a small folded strip of cardboard and glue them on each side of the motor. Once the glue is dry all you will need to secure the motor in place is a small piece of tape going across it which will anchor it to the cars chassis.
|
 |
The Solar Cells
Connect the solar cells together, the positive of one cell to the negative of the other cell. Use either a thin strip of metal (connectors) or use a piece of small wire. Tape the back of the cell together to secure them. You may want to build a support for the cells to secure them in place and keep them from sliding off the car. The support can be built by using a piece of hard wire, similar to a hanger, laid across the chassis (preferably use an aluminum wire as it is lighter).
|
 |
Final Step
Connect the cells to the motor by using small wires. To reverse the direction that the motor will turn just switch the connection around. Add the elastic band between the driving wheel and the motor, and Presto!
|
 |
Congratulations!
You just finished building a mini green machine.
|
 |
Running the Solar Car
Take your car outside, to a flat smooth surface with lots of sun and have fun (preferably to a park and not on the street). Don't forget to name your car, we called ours xof1 (the short form of "The Power of One"). If you want to see other cool solar cars check out our "Links" for links to colleges, universities and even private teams that are building solar cars (it may be a team in your area). The solar car team members are friendly and are always eager to help a fellow solar car enthusiast, and who knows, you may even join one of them in the future. Also visit About Us - "Team" to meet all the nice people on our team.
|
 |
Explore
Get your friends involved too and have a friendly competition. Whose car goes the fastest and why? Add more cells. What happens? Add the cells in parallel (negative to negative and positive to positive). What happens? Try adding or removing weight to and from the car. How fast does it move? Try modifying the design of the car (axles closer together in the center or towards one end). Is it less stable? Why? What happens if you change the size of the wheels? Does it lose power? Does it go faster?
|

No comments:
Post a Comment